











Why do I shoot large format film? That question can be also rephrased to why shoot film at all? The problem with the world today is instant gratification. Instant coffee, online buying, instant 24-hour support etc. This also crept into the photographic arena during the time of film photography when people shot polaroid images.
The next question that usually comes up is: “Is digital better than film?” The answer to either way of asking this question is… no. Just as one might prefer the crisp, clean sound of a digital song, another may prefer a classic vinyl record for its depth, tone and warmth. In the same way, digital photography gives way to predictable, clean and precise results, while film brings in a warm beautiful imperfection that often times speaks to the romance of a scene. Grain is not noise, grain is film and in the right composition ISO 3200 pushed to ISO 6400 can produce beautiful images.
Ever wonder why there were so fewer professional photographers in the days before digital? Photography was a skill, an art and craft to master. Today, every cellphone has a camera, everyone is a photographer, and anyone can walk into a camera store, buy an entry-level camera and announce themselves as a professional! Do they really know their craft, have they acquired the necessary skill needed for the task at hand? With 14fps and high megapixel cameras, anyone can fire away and hope to land 3 perfect shots in that second. Spray and pray they say!
With 35mm, 120 medium format and large format film – 4×5″ and larger, there is no back of the camera peeping to see if you got it right the first time, every time! You need to wait until the film is processed to know if you got it right in camera! Film slows you down, you need to think about your composition, make sure everything is 100% before you press the shutter button. If you shooting 35mm, you will more than likely have 24 or 36 frames to complete. On medium format, that is 12 frames. Large format and ultra large format film, it is 1 sheet at a time, which are not cheap, more so if you going above 4×5”. There is no delete button and try again, once the shot is fired that is it! It has to count, it has been exposed and you cannot under that, there are no second chances, more so in critical moments.
When you shoot film, you are rewarded with images that stand out, knowing that you had to go back to basics to create that shot. You captured the moment on an old outdated camera, some nothing more than a wooden box with a ground glass, bellows, lens and no electronics! Large format is a totally manual shooting mode, no autofocus whatsoever the only external electronics is your lightmeter. Seeing the film image come to life in the darkroom before your eyes is something else to behold. Seeing the resolution in comparison to 35mm digital is astounding! This is why I shoot 35mm, medium and large format film, its the challenge of getting a 100% success rate for every roll or film sheet exposed, slowing down, thinking about what I am are doing, capturing images that I will actually print and most of all, to enjoy my photography. The rewards from large format for me is once you get it right in camera, the results are mind-blowing, get it wrong and they are amplified as much!
Here are two images from a shoot recently shot in my studio. I had my friend Chris Hart fire the shot for me while I posed with my mom, the other I took of my makeup artist – Anne-Mart. Works like these get me so excited about film! Do look out for an upcoming blog regarding this studio shoot.
I began photography in 1998 on a Pentax MZ50 35mm camera after playing around with a few point and shoots. My foundation has been a solid one in film, and I am all the better for it. People with a discerning eye know that digital does not look like traditional film, even with the available film plugins or filters. Both can be beautiful in their own right. The artist needs to decide which method or combination of methods best produces the final work of art.
The different size formats are as follows 35mm, medium format also called 120, 220 and 645, large format and ultra large format.
35mm or 135 film, was introduced by Kodak in 1934. Individual rolls of 35mm film are enclosed in a single-spool, light-tight, metal case that allows it to be loaded into cameras in daylight. The standard image size on a 35mm film roll is 24 x 36mm with a perforation size of KS-1870. This standard ensures that the film properly advances eight perforations to allow a two-millimetre gap between frames and eliminate overlapping of images on the film. On my Nikon F5, I have an MF28 databack attached, which allows me to record various fields of information such as date, time, shutter speed, aperture and more between these frames.
Medium format film is much larger than the 35mm counterpart and is usually preferred by many professional photographers – digital and film. Of course, due to the size of medium format film, a medium format camera will be needed to use it. Most often, medium format film is 6x6cm square or 6×4.5cm rectangular (commonly referred to as 645). In addition, there are also these following sizes – 6x7cm – 10 exposures and 6x9cm – 8 exposures; and longer if you doing panoramas. Each format creates an image with one side equal to 6cm. Today, medium format photography utilizes the 120 film format and, in some cases, the 220 film format. These formats are nearly identical except that 220 film is twice as long and allows twice the number of exposures. With 120 film, you can get either 12 or 16 exposures and double that amount with 220 film. So if you think that Instagram is a new thing, think again, these are generally square images. Why not give a try and upload these to your Instagram account?
The most common large format is 4×5″, which was the size most common cameras used in the 1930s-1950s. The 4×5″ sheet film format was very convenient for press photography since it allowed for direct contact printing on the printing plate, hence it was widely used in press cameras. This was done well into the 1940s and 1950s. Less common formats include quarter-plate, 5×7″, and 8×10″ (20×25 cm).
Large format film works a little different than both 35mm film and medium format film as there are no spools used. Instead, large format film is individual 4×5″ sheets that are loaded into a special film holder that locks into the back of a large format camera. Film loading using sheet film holders must be loaded in complete darkness, or a dark space to load and unload the film, typically a changing bag or darkroom. The holders will hold two sheets of film on both sides. When loaded into the back of the camera, the light protective sheet or dark slide is removed and will allow you to expose the film, once the shutter is released. The protective sheet or dark slide is then returned to the holder before your film is removed. The film will remain in the holder until ready for development.
In May 2017, I had seen a post circulating on social media where Paul Joshua was photographing Formula 1 with a 104yr old camera, a 1913 Graflex 4×5″ View Camera, at the time he was on his 5th season of Formula 1. Here are the links to those articles and on PetaPixel, definitely well worth the read!
If ever there was a sport that required rapid fire photography, Formula One racing is it. Which makes what photographer Joshua Paul does even more fascinating, because instead of using top-of-the-range cameras to capture the fast-paced sport, Paul chooses to take his shots using a 104-year-old Graflex 4×5 view camera.
The photographer clearly has an incredible eye for detail, because unlike modern cameras, which can take as many as 20 frames per second, his 1913 Graflex can only take 20 pictures in total. Because of this, every shot he takes has to be carefully thought about first, and this is clearly evident in this beautiful series of photographs.
Above 8×10″, the formats are often referred to as Ultra Large Format (ULF) and may be 11×14″, 16×20″, or 20×24″ or as large as film, plates, or cameras are available. These cameras are extremely heavy, and usually made of wood. There is an article on F-stoppers where an 8×10″ large format photographer – Ben Horne captures an astounding 709-megapixel image! His 150mm lens is referred to as a wide angle lens! Ben ends up with a digital file that’s almost 30 000 pixels on the long side and weighs in at an astounding 4 GB for the *.tiff file, but it appears the unwieldy size is worth it. This image was shot on Velvia 50. The YouTube video is worth watching.
I shoot a Shen Hao HZX45-IIA 4×5″ format field camera as pictured below. These cameras new at the time of writing, retail for around $1000 or more depending on where you buy. The tripod in this set up was seriously expensive, more than the camera itself; together they do a very good job as the camera is by no means light. Although the camera is a Chinese make, the quality is very good and I am well satisfied with mine.
Specifications:
• Made from Black Walnut and black stainless steel.
• Format: 4X5″
• Movement: Front Rise – 37mm Rear Rise – 45mm.
• Fall 32mm
• Right Shift rear – 40mm
• Left Shift rear – 40mm
• Swing 17° +17°
• Front Swing 20° +20°
• Rear Base Tilt: 90°
• Front Base Tilt: 90°
• Rear Center Tilt: 10° +10°
• Rear Back Front 40°
• Back Rear 20°
• Forward Rear 70mm
• Bellows extension from 50mm-360mm.
• Dimensions: 17X17x10cm
• Weight: 2.54kgs
The tripod that I am using is the Gitzo GT3542L Long series 3 Carbon Fiber Tripod which is designed to securely support professional cameras with 300mm lenses (up to a maximum of 400mm), and to reach eye-level when fully extended. This professional tripod features Carbon eXact tubing with larger leg tube diameters. Its top leg-section diameter of 32.9mm and high modulus carbon fibre lower leg sections make this tripod stronger, more rigid and more lightweight than its predecessors. The Gitzo GT3542L weighs just 1.95kgs, reaches a height of 178cm and folds down to 59cm. This tripod is the perfect choice for professional photographers who want highly resistant, reliable support that is light enough to carry for hours while exploring the great outdoors. Large format gear is far from light, and this is a great tripod for my digital long primes too.
The tripod’s rapid centre column is easily removed, transforming it into a ground level set enabling photographers to capture the broadest range of perspectives. It also has a reversible column mechanism. The Gitzo GT3542L four-section legs are secured by G-lock Ultra twist locks, with a built-in O-ring that keeps dirt and dust out of the leg mechanism. The tripod’s top spider is newly designed for extra rigidity, and large leg angle selectors provide broader grip-area for leg-angle adjustment. The tripod features a stabilizer hook on its centre column to add weight and increase stability when required by terrain or equipment weight. Its removable feet enable it to adapt to any type of surface. A wide array of heads and other accessories can easily be added via the 1/4″ and 3/8 attachment on the upper disc. It can support 21kgs.
The Gitzo GH5381SQD Systematic Series 5 Quick Release D Ball Head is a low-profile tripod head that fits into the upper casting of any Systematic Tripod or attaches to any tripod via its 3/8” thread, providing an ultra-stable platform. The D-profile head is supplied with an Arca-Swiss compatible plate, enabling the included Quick Release plate to be snapped into the head from above, which is faster and easier than sliding it in from the side.
With the GH5381SQD, cameras can be mounted very close to the top of the tripod for optimal support. It tilts up to 28° in all directions and features a hydraulic locking system for fast control and smooth locking speed. A ring adaptor (GS5300S) is included and is required when using this head with a Series 5 Systematic Tripod. This tripod head model also features the new Systematic safety catch: when used together with the latest Systematic tripods equipped with the safety button, the head is held safely in place until the release button is pushed, so that it stays safe, along with any camera equipment attached to it, even if the tripod’s top casting is inadvertently left open. The tripod head is made of high-quality, resistant aluminium, weighs 930g and secures an impressive payload of 30kgs. It includes a built-in spirit level to facilitate flawless framing.
I am using the Nikon AR-3 Threaded Cable Release, this is a standard type cable release plug for cameras that have a threaded shutter. This screws into the Copal shutter that you using with your lenses. It can be tightened at the trigger end to facilitate long exposures beyond the lowest shutter speed supported before using B and T. There are no electronics on my Shen Hao.
All of the Nikkor large format lenses are multicoated. Nikon never made any single or non-coated large format lenses.
The SW-series lenses feature wide covering power and a wide image circle. Maximum apertures of f/4 and f/4.5 assure fast and pin-point focusing and bright images, corner to corner. Covering power can be extended to 105° ~ 106° by stopping the lens down. SW series lenses deliver high contrast and resolution, reduced flare and excellent colour rendition, thanks to Nikon Super Integrated Coating and strict control of aberrations. SW-series lenses with a maximum aperture of f/8 are compact and well compensated for distortion.
The Nikkor-SW 65mm f/4S can only be used from f/16 as the image circle is too small at f/4 on the 4×5 format at 110mm. At f/16 you will get an image circle of 170mm. The f/4 allows you to focus better under low light conditions. This is a wide angle lens which is the 35mm equivalent of a 20mm lens. The rule is to divide the focal length by three to arrive at the 35mm format approximate equivalent.
The Nikkor-SW 65mm f/4S is excellent; it weighs in at 370g. The f/4S makes it easy to compose, focus and make camera movements. It has a 67mm front filter thread with 7 elements in 4 groups. The shutter is a Copal № 0 T, B, 1-1/500 which is also the sync speed in the studio.
Of course, you don’t actually shoot at f/4.5, where it’s a little soft due to coma. This is the same as other f/5.6 lenses; stop down to f/8 or smaller for the best performance when you shoot. For landscapes, you generally shooting at f/22 and f/32.
The Nikkor-SW 75mm f/4.5S can only be used from f/16 as the image circle is too small at f/4 on the 4×5 format at 126mm. At f/16 you will get an image circle of 200mm. The aperture of f/4 allows you to focus better under low light conditions. This is a wide angle lens which is the 35mm equivalent of a 25mm lens. The rule is to divide the focal length by three to arrive at the 35mm format approximate equivalent.
The Nikkor-SW 75mm f/4.5S is excellent; it weighs in at 420g. The f/4.5S makes it easy to compose, focus and make camera movements. Like the Nikkor-SW 65mm f/4S, it has a 67mm front filter thread with 7 elements in 4 groups. The shutter is a Copal № 0 T, B, 1-1/500 which is also the sync speed in the studio.
Of course, you don’t actually shoot at f/4.5, where it’s a little soft due to coma. This is the same as other f/5.6 lenses; stop down to f/8 or smaller for the best performance when you shoot. For landscapes, you generally shooting at f/22 and f/32.
The Nikkor-SW 90mm f/4.5 is both huge and excellent; it weighs in at 600g. I had the opportunity to buy the f/8 version (which weighs 360g), but chose this faster lens instead, as the f/4.5 makes it easy to compose, focus and make camera movements. It has an 82mm front filter thread with 7 elements in 4 groups. The shutter is a Copal Copal № 0 T, B, 1-1/500 which is also the sync speed in the studio.
The image circle is at f/4 on the 4×5″ format at 154mm. At f/16 you will get an image circle of 235mm. The aperture of f/4 allows you to focus better under low light conditions. This is a wide angle lens which is the 35mm equivalent of a 28mm lens. The rule is to divide the focal length by three to arrive at the 35mm format approximate equivalent.
Of course, you don’t actually shoot at f/4.5, where it’s a little soft due to coma. This is the same as other f/5.6 lenses; stop down to f/8 or smaller for the best performance when you shoot. For landscapes, you generally shooting at f/22 and f/32.
Covering power of the W series Nikkors is an ample 70° ~ 73° when stopped down. Lens construction of six elements in four groups in the series gives these lenses an outstanding degree of freedom from distortion, field curvature and chromatic aberration. And Nikon Super Integrated Coating applied to each lens assures high contrast and overall faithful colour rendition. The W series lenses are recommended for a variety of subjects, including landscapes, portraits, architecture, and table-top photography. I am in the process of acquiring these lenses in this series, to complete the large format lens range that suits my style of photography.
The Nikkor-W 135mm f/5.6S has an image circle of 156mm at f/5.6 and at f/22 it is 200mm. The aperture of f/4 allows you to focus better under low light conditions. This is a standard angle lens which is the 35mm equivalent of a 45mm lens. The rule is to divide the focal length by three to arrive at the 45mm format approximate equivalent.
The Nikkor-SW 135mm f/5.6S weighs in at 200g. The f/5.6 makes it easy to compose, focus and make camera movements. It has a 52mm front filter thread with 6 elements in 4 groups. The shutter is a Copal № 0 T, B, 1-1/500 which is also the sync speed in the studio.
Of course, you don’t actually shoot at f/4.5, where it’s a little soft due to coma. This is the same as other f/5.6 lenses; stopped down to f/8 or f/11 it is sharp from centre to corners. For landscapes, you generally shooting at f/22 and f/32.
The Nikkor-W 180mm f/5.6 has an image circle of 208mm at f/5.6 and at f/22 it is 253mm for 5×7″ cameras. The aperture of f/5.6 allows you to focus better under low light conditions. This is a standard angle lens which is the 35mm equivalent of a 60mm lens. The rule is to divide the focal length by three to arrive at the 60mm format approximate equivalent.
The Nikkor-W 180mm f/5.6 weighs in at 380g. The f/5.6 makes it easy to compose, focus and make camera movements. It has a 67mm front filter thread with 6 elements in 4 groups. The shutter is a Copal № 1 T, B, 1-1/400 which is also the sync speed in the studio.
Of course, you don’t actually shoot at f/5.6, for landscapes, you generally shooting at f/22 and f/32.
The Nikkor-W 210mm f5.6 243mm f/5.6 has an image circle of 208mm at f/5.6 and at f/22 it is 295mm for 6.5×8.5″ cameras. The aperture of f/5.6 allows you to focus better under low light conditions. This is a telephoto angle lens which is the 35mm equivalent of a 60mm lens. The rule is to divide the focal length by three to arrive at the 60mm format approximate equivalent. The Nikkor lenses in the T-series are telephoto-type lenses which do not require long-length camera bellows.
The Nikkor-W 210mm f/5.6 weighs in at 460g. The f/5.6S makes it easy to compose, focus and make camera movements. It has a 67mm front filter thread with 6 elements in 4 groups. The shutter is a Copal № 1 T, B, 1-1/400 which is also the sync speed in the studio.
Of course, you don’t actually shoot at f/5.6, for landscapes, you generally shooting at f/22 and f/32.
The Nikkor-W 240mm f5.6 243mm f/5.6 has an image circle of 278mm at f/5.6 and at f/22 it is 336mm for 8×10″ cameras. The aperture of f/5.6 allows you to focus better under low light conditions. This is a telephoto angle lens which is the 35mm equivalent of an 80mm lens. The rule is to divide the focal length by three to arrive at the 80mm format approximate equivalent.
The Nikkor-W 240mm f/5.6 weighs in at 820g. The f/5.6 makes it easy to compose, focus and make camera movements. It has an 82mm front filter thread with 6 elements in 4 groups. The shutter is a Copal № 3 T, B, 1-1/125 which is also the sync speed in the studio.
Of course, you don’t actually shoot at f/5.6, for landscapes, you generally shooting at f/22 and f/32. This is a beautiful lens for portraiture for both the studio and outdoors.
I do not own a Nikon 150mm lens. At the time of me purchasing my 4×5″ system, the Schneider 150mm f/5.6 Apo-Symmar L Lens came part and parcel with the package. I do not see the need or purpose to purchase a Nikon 150mm lens as this lens does a fabulous job. This is a standard angle lens, all-purpose large format lens which gives the highest image reproduction quality possible in a broad range of applications, equivalent to a 50mm lens in 35mm format.
The 75° angle of coverage permits generous shifts on the 4×5″ format, which is very useful in architecture photography.
The 150mm Apo-Symmar L uses 58mm filters and weighs 267g. It is an ideal everyday lens for users of 4×5″ large format cameras.
The Apo-Symmar-“L” series of lenses replaces the well-proven original Apo-Symmar. As some glass types have been phased out for environmental reasons, new designs with substitute formations were necessary. Seizing the opportunity, Schneider-Kreuznach has now completely re-designed this successful, all-purpose lens to bring it up to the current state-of-the-art of lens design and fabrication.
The covering power has been expanded in nearly all cases and the imaging performance further optimized. The current focal lengths and the principle technical specifications are shown in the table here.
Used according to the maximum photo format, the focal lengths between 120 and 480mm offered by the new “L-Series” deliver normal perspective pictures without a wide angle or telephoto effects.
This is a large format photographic lens for view camera photography with film formats up to 5×7″, although it’s most common use is for 4×5 inch photography. It has a 75° angle of coverage at f/22. This results in an image circle of 233mm at f/22, which allows a shift of up to 52mm vertically and 46mm horizontally with 4×5 inch film.
This is a large format photographic lens for view camera photography with film formats up to 5×7″, although it’s most common use is for 4×5″ photography. It has a 75° angle of coverage at f/22. This results in an image circle of 233mm at f/22, which allows shift of up to 52mm vertically and 46mm horizontally with 4×5″ film.
Manufactured in Japan by the Copal Company LTD since 1946, Copal shutters are widely used on large-format photography lenses. Fully mechanical, very reliable lens shutters, they are quite repairable by many technicians all over the world. There are two types, self-cocking or press shutters and manual cocking. They are basically old-fashioned clockwork systems with leaf blades for the shutter.
| COPAL LENS SHUTTER | № 0 | № 1 | № 3 | № 3S |
| Weight | 115gr | 160gr | 372gr | 340gr |
| Outer diameter | 61mm | 73mm | 102mm | 102mm |
| Lens mounting | Front: M 29.5mm x 0.5 Rear: M 29.5mm x 0.5 |
Front: M 40mm x 0.75 Rear: M 36mm x 0.75 |
Front: M 58mm x 0.75 Rear: M 58mm x 0.75 |
Front: M 56mm x 0.75 Rear: M 56mm x 0.75 |
| Cable release nipple | M 3.2mm x 0.5 | M 3.2mm x 0.5 | M 3.2mm x 0.5 | M 3.2mm x 0.5 |
| Shutter speeds | T, B, 1, 2, 4, 8, 15, 30, 60, 125, 250, 500 |
T, B, 1, 2, 4, 8, 15, 30,60, 125, 250, 400 |
T, B, 1, 2, 4, 8, 15, 30, 60, 125 |
T, B, 1, 2, 4, 8, 15, 30, 60, 125 |
| Shutter speeds tolerance | +- 30% | +- 30% | +- 30% | +- 30% |
| Maximum iris opening | 24mm | 30mm | 45mm | 45mm |
| Minimum iris opening | 1.5mm | 2mm | 2mm | 2mm |
| Number of iris blades | 5 | 7 | 7 | 7 |
| Synchronization | all shutter speeds | all shutter speeds | all shutter speeds | all shutter speeds |
| Max. sync delay times | before max. opening: 0.5ms after max. opening: 0.7ms |
before max. opening: 0.5ms after max. opening: 0.7ms |
before max. opening: 0.5ms after max. opening: 0.7ms |
before max. opening: 0.5ms after max. opening: 0.7ms |
| Threaded mounting ring | M 32.5mm x 0.5 | M 39mm x 0.75 | M 62mm x 0.75 | M 61mm x 0.75 |
| Lens board hole | 34.6mm | 41.6mm | 65mm | 64.1mm |
This is a Copal № 0 shutter. The shutter speeds are T, B, 1, 2, 4, 8, 15, 30, 60, 125, 250 and 500. It has an aperture scale range of f/5.6 to f/64.
This is a Copal № 1 shutter. The shutter speeds are T, B, 1, 2, 4, 8, 15, 30, 60, 125, 250 and 400. It has an aperture scale range of f/5.6 to f/64.
This is a Copal № 3 shutter. The shutter speeds are T, B, 1, 2, 4, 8, 15, 30, 60 and 125. It has an aperture scale range of f/4.5 to f/64.
Alex Burke of Alex Burke Photography a large format landscape photographer from Greeley, Colorado, in the USA has a fully comprehensive blog on various film types, both current and discontinued. Do have a look at his blog and consider buying his informative ebook on large format photography. My choice of colour film is Kodak Portra, I am not so wild about Kodak Ektar 100. My choice for slide or transparencies is Fuji Provia and Velvia. Bellini manufactures developing chemicals that allow you to process your negatives to positives or slides, so one is not necessarily limited to only Fuji for slide films, these can be purchased here. Black and white film, its a mix between Kodak and Ilford, there are other brands on the market like Adox, Bergger Pancro, Fomopan, Arista etc which I have not shot yet. I would like to shoot Rollei Infrared and would like to see how that performs, infrared produces amazing portraits with soft skin textures.
Film is best stored in the fridge to ensure an even, constant temperature and longevity. To prevent condensation from forming on the surfaces of film taken from a refrigerator or freezer, allow the package to warm up to room temperature before breaking the seal or opening the container. Warm-up times vary with the amount of material, the type of package, and the storage temperature. Typical warm-up times are given in the table below in hours to reach a room temperature of 21°C from a storage temperature of:
| FILM SIZE | -18°C | 02°C | 13°C |
| 120 | 01h00 | 00h45 | ooh30 |
| 135 | 01h30 | 01h15 | 01h00 |
| 135 100′ Roll | 05h00 | 03h00 | 02h00 |
| 10 Sheet Box | 01h30 | 01h00 | 01h00 |
| 50 Sheet Box |
03h00 | 02h00 | 02h00 |
These are very handy, as 10 holders or 20 exposures become rather bulky in one’s bag. The need for these to be either attached to your bag in a film holder or kept in your Pelican case helps keep things in order. If you are travelling light, I can strongly recommend these bags.
I have a system in place; all film that is not exposed is sealed in plastic packets, the holders are labelled with the type of film and kept in either my camera bag if I am not shooting a lot of film. The exposed frames are then put back into the opened plastic bags and those film holders placed in this bag which eliminates the mistake of double exposing my film. They are well padded and can protect and carry up to six 4×5″ film holders. A mesh pocket on the front provides convenient storage for dark slides or small accessories.
These hold the same size film format as the camera size you shooting. It is basically a lightproof tray with a darkslide. Once the film holder is in place in the camera, the darkslide can be removed and the film is ready to be exposed. Once exposed the darkslide is returned and your image is safe, as long as the darkslide is not removed before development in the darkroom. I keep the white side of the darkslide facing outwards to show it has not been exposed and doesn’t need the darkroom. Once exposed, I flip it around, black side outward.
The made in England, 550 Original Shoulder Bag from Billingham is designed to carry a medium-format, large-format or DSLR camera plus accessories. The case is khaki with tan leather trim. It is constructed from soft-weave fabric which helps eliminate abrasions, combined with Stormblocker dual-laminate waterproof canvas and a heavy-duty, closed-cell, foam-padded interior. It has Superflex 10-15 and 10-18 partitions for organizing gear. There is a large rain flap with buckle fastening.
The 550 bag has two full-height zippered pockets inside the main compartment, double-bellowed front pockets with press-stud fastenings, two removable end pockets, and an external back pocket. It is carried by dual handles with an overlapping leather grip or an adjustable shoulder strap with an SP20 heavy-duty, neoprene-backed leather shoulder pad. This is a really expensive and good quality camera bag.
Here is a breakdown of roughly how one goes about shooting a frame on a large format camera:
With today’s technology, instead of using a traditional light meter to calculate the exposure time, you can simply use an app on your phone. There are plenty of mobile phone apps which are available from the various app stores where you in dial the aperture and ISO, and it calculates the time needed to properly expose your image. I use a Sekonic L-478DR light meter as well as a phone app.
Product information and images have been acquired from the relevant manufacturer websites.
Please subscribe to my free monthly NO-SPAM newsletter which will inform you of any new workshops, activities, products and upcoming events.
SUBSCRIBEI am a Western Cape Winelands photographer based in South Africa, photographing locally and internationally. I am a registered NPS (Nikon Professional Services) member, a contributor to Nikon South Africa's social media pages and website. I photograph a broad variety of genres, using film - 35mm, 120, 127 and 4x5" 4x10, 5x7" & 8x10" format as well as digital medium and are very passionate about my work.
My work has been published in various South African newspapers and magazines including Atlantic Gull Magazine with a cover, SA4x4, HIGH LIFE (British Airways Magazine), Getaway Magazine, Wildside Magazine and Weg!/go! Magazine. I finished as a Top Ten finalist in the 2016 Getaway Magazine Gallery Competition, finishing with Highly Commended. The South-African national news broadcaster eNCA has also made use of video footage that I have produced.
Please feel free to comment and share. You can also click on the social media buttons in the footer below and see what I am currently doing, or sign up for my newsletter and follow me.
Until next time, thanks for your support, appreciating my work and reading my blogs.
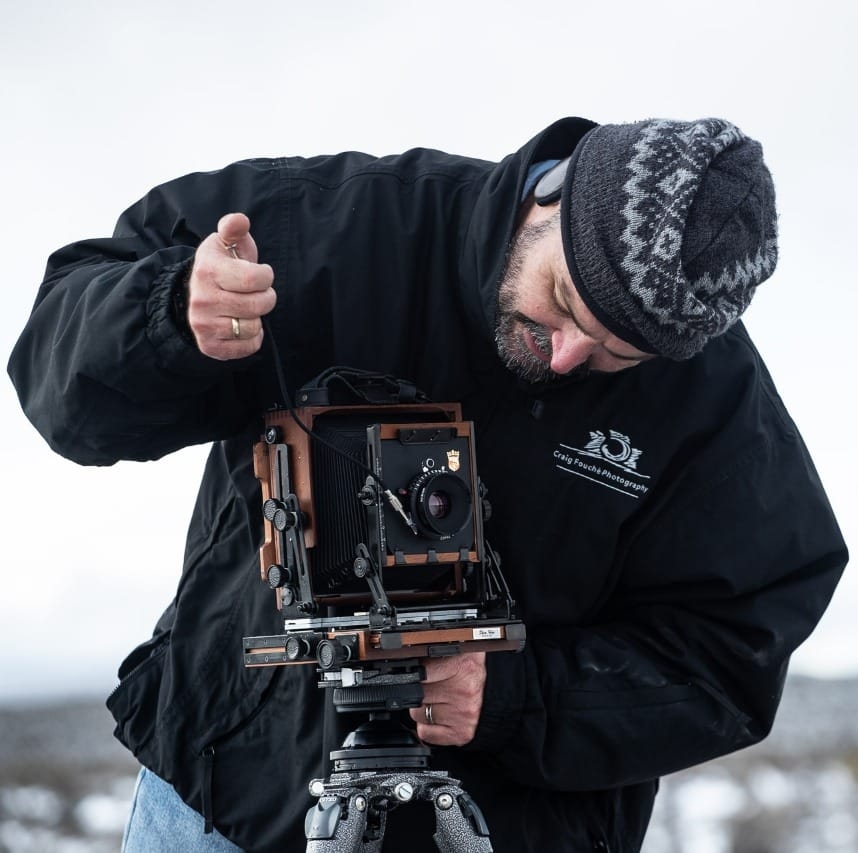
Craig Fouché, Rogge Cloof, Sutherland, South-Africa ©2020 Kirsten Frost Photography